Showing posts with label Tutorial. Show all posts
Sunday, 24 March 2013
Simply Adorable Texture Set & Walk Thru
Simply Adorable Texture Set & Walk Thru contains seven assorted textures of various
colors and sizes. Click on the Read More link below for a simple walk thru example
using easy to follow text and images. Hope this set and example can be of use.
BELOW IS AN EXAMPLE OF HOW I USED/APPLIED 2 TEXTURES IN THE SET.
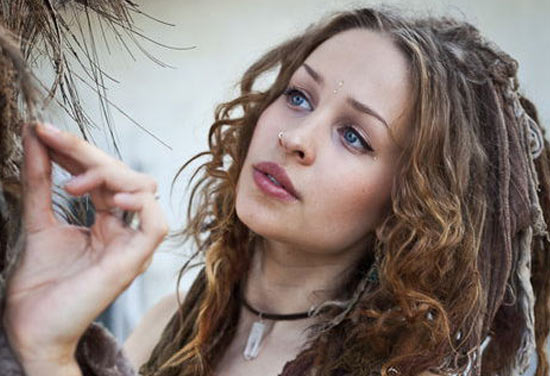
STEP 1: OPEN IMAGE TO USE
STEP 2: OPEN GLOW 3 TEXTURE SEEN ABOVE "WHICH BECOMES LAYER 1" >
SET LAYER MODE TO 'MULTIPLY' AND OPACITY AT 78% SEEN BELOW.
STEP 3: NOW OPEN iBLUE TEXTURE SHOWN ABOVE "WHICH BECOMES
LAYER 2" > SET LAYER MODE TO 'COLOR BURN' AND OPACITY AT 46%
AS SEEN BELOW
STEP 4: NOW SELECT THE ERASER TOOL > MEDIUM SOFT > THEN GO BACK
TO LAYER 1 AND ERASE THE TEXTURE FROM THE FACE AND NECK, DO THE
SAME FOR LAYER 2.
BEFORE DUPLICATE BACKGROUND LAYER APPLIED SEEN ABOVE
STEP 5: NOW GO TO THE BACKGROUND LAYER AND RIGHT CLICK AND SELECT DUPLICATE LAYER, THEN DRAG IT UP ON TOP OF ALL LAYERS, THEN SET LAYER
MODE TO 'MULTIPLY' AND THE OPACITY AT 38% SEEN BELOW.
ITS HARD TO TELL A DIFFERENCE, BUT THERE IS AND WILL BE A DIFFERENCE
WHEN APPLIED.
STEP 6: LOOKING GOOD, JUST ONE SMALL PROBLEM, I'M NOT HAPPY WITH
THE BOTTOM RIGHT SHOULDER, I FIND IT DISTRACTING,
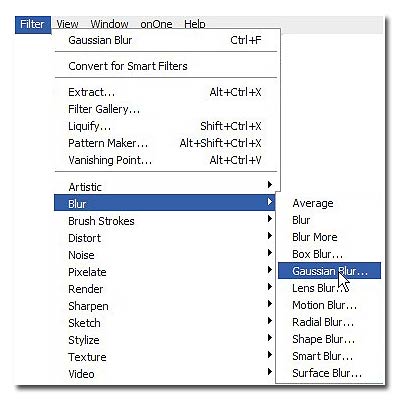
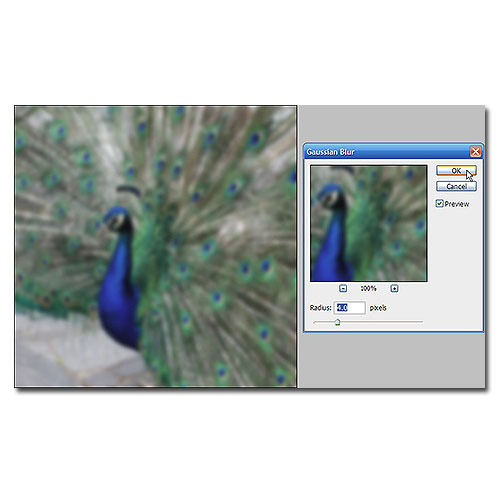
A QUICK FIX IS NEEDED SO I GO TO LAYER 1 AND SELECT IT > THEN I GO TO
FILTER > BLUR > GAUSSIAN BLUR > SET IT TO 27.0 PIXELS AND CLICK OK,
LOOKS BETTER AS SEEN BELOW.
STEP 7: I'M SATISFIED AND DONE.
** OPTION: YOU MIGHT WANT TO MAKE A DUPLICATE OF THE ORIGINAL
BACKGROUND AND DRAG IT TO THE TOP, JUST SO YOU CAN CLICK ON AND
OFF TO SEE THE DIFFERENCE'S BETWEEN THE ORIGINAL AND TEXTURED
VERSIONS. **
HOPE THIS WAS HELPFUL AND CAN BE OF SOME USE.
DOWNLOAD ZIPPED SET HERE:
Tuesday, 14 August 2012
Sunwashed Colored Effect Tutorial
Sunwashed Colored Effect Tutorial is but a simple way to add a golden washed out
effect with some pumped up contrast to an image simply by adding some colored
layers while applying different layer modes and opacity levels within Photoshop.
Before (above)
After (above)
Before (above)
After (above)
SUNWASHED COLORED EFFECT TUTORIAL:
1: OPEN AN IMAGE YOU WISH TO USE (WORKS BEST ON PORTRAITS) THIS
WILL BECOME THE BACKGROUND LAYER.
2: CREATE A NEW LAYER AND FILL WITH THE COLOR ( e79f74) AND SET TO
OVERLAY MODE.
3: DUPLICATE THE BACKGROUND LAYER AND MOVE TO TOP LAYER, CONVERT
TO BLACK AND WHITE (Ctrl+Shft+U) AND LEAVE AT NORMAL MODE THEN SET
THE OPACITY AT 43%.
4: CREATE A ANOTHER NEW LAYER AND FILL WITH THE COLOR (00515) AND SET
TO SCREEN MODE AND THE OPACITY AT 44%.
5: DUPLICATE THE BACKGROUND LAYER AGAIN AND MOVE TO THE TOP LAYER,
AND SET TO SOFT LIGHT MODE AT 100%.
6: CREATE YET ANOTHER NEW LAYER AND FILL WITH THE COLOR (a3c1dd) AND
SET TO COLORBURNED MODE AND THE OPACITY AT 42%.
7: THAT'S IT!
Before (above)
After (above)
Hopefully this simple effect can be of some small help whether applying the effect or
help in understanding other ways to apply effects other than by the use of textures,
or actions.
Saturday, 12 November 2011
Letterpress Tutorial
Here's a quick and simple tutorial on how to apply the popular
letterpress effect.
Sorry for not posting sooner, but it seems the up and down yo-yo
weather we're experiencing here in southern Indiana has given me
one hell of a cold, my head feels like it's full of cotton balls and I
feel like I have a elephant sitting on my chest, not to mention the
never ending coughing and phlegm has resulted in a sore throat.
Download Tutorial Here:
OR DOWNLOAD HERE
Friday, 29 April 2011
You'd Be Surprised texture
You'd Be Surprised texture: At first glance the texture "Posted On The Bottom" is dark, grungy and down right ugly. Don't let the darkness fool you, it has a wonderful ability to
bring out and enhance contrast and details in images if used right. Two examples below show the before and after effects by just selecting a supporting layer mode within Photoshop.
Roll Cursor over image to view rollover effect:

TeaTime: "Pictured Above" I applied the "You'd Be Surprised texture,then set the "Layer Mode" to "Overlay" and the opacity at at 100%.
Bubbles: "Pictured Below" I applied the "You'd Be Surprised texture,then set the "Layer Mode" to "Soft Light" and the opacity at at 100%.

Roll Cursor over image to view rollover effect:
This is "You'd Be Surprised" the texture used in the examples.
** DOWNLOAD LINK FIXED " MARCH 24th 2013**
Download The Texture Here:
Texture is hosted at Picasa, which can be at times slow or buggy, if any problems just revisit and try again. Just click the Download Link posted above and then at Picasa click download and save.
Friday, 4 February 2011
Another Retro Vintage Effect Tutorial

Seems like everywhere you look, there's an image with a retro/vintage look effect. There's so many ways to achieve this effect, whether it be filters, presets, actions, or textures, I'm gonna show you a simple way, which might seem long but the more you work with the tools within Photoshop such as levels, curves, photo filters among others the easier it will get, plus you may learn some new tools you've never used before.
1. Open an image in Photoshop (Background Layer)
2. Go to image / adjustments / levels / use these settings (0 - 1.20 - 255)
3. Next go to image / adjustments / curves / set a point at (74 and 50)
4. Set another point at (188 and 97)
5. Now go to image / adjustments / brightness/contrast and set brightness to (+5) and contrast to (+3)
6. Now we're gonna set 2 photo filters, go to image / adjustments / photo filter, first - color (AC7A33) density 75% then press OK. Second - color (31260C) density 60%.
7. Make a new layer and fill it with a dark blue (0C3088) set the opacity to 70%, fill at 80%, and blending mode to (lighten)
8. Make another layer and fill it with a light orange (EFD56C) set the opacity to 50%,leave the fill at 100%, and the blending mode to (multiply)
9. Next go to image / adjustments / levels / and use (26 - 1.00 and 238)
10. Now make a duplicate of the background layer then go to filter / sharpen / and click sharpen, now drag the duplicate layer to the top.
11. Last, "I heard that" go to image / adjustments / desaturate / set the opacity and layer mode to your liking, here I sat the layer mode to (normal) and the opacity to (27%)
That's it, we're done. I know this may seem a long process, but the more you work with curves and levels the easier it will get.
Wednesday, 19 January 2011
Monday, 10 January 2011
Texture Overlay Tutorial
Tuesday, 10 August 2010
Brush Painting on a Layer Mask:
Masks are incredibly useful for blending photos and hiding portions of images without altering them directly. In this tutorial we'll learn how to use the brush palette and fill layer
with mask to make a photo layer mask.
Creating attractive photo borders or creative cutouts can be an easy and fun task when using masks. In this short tutorial I will show you how to give your photos an easy and creative cutout while painting on a mask with brushes.
1. Open a photo that you intend to use. This is what I’ll use to demonstrate.

2. Make a solid fill adjustment layer by clicking Layer>New Fill Layer>Solid, or click on the half black/half white circle in the bottom of the layers palette and choose Solid fill. Choose white as the color. Follow images shown below.

3. Lower the opacity of the fill layer to reveal the photo underneath. Somewhere around 75% should do nicely.

Now you should be able to see the image underneath as shown below.
4. Choose the Brush Tool[B] and select a big brush, preferably a paint stroke brush, something with character and ragged edges. Choose black as your foreground color.
5. Select the mask on the Fill Layer, now start painting with your brush to reveal what you want visible, if you feel you messed up on a spot, just select white as your foreground and paint over it to cover it up, then switch your foreground back to black and continue till you feel satisfied with the results. When done be sure to raise your opacity back to 100% and flatten and save.

Here’s what I have using the brush selected from above step 5.
Something I like doing also, is to use some swirl or decorative brushes to add some flair.

6. Optional, you can always reduce the opacity of the brush in the options bar at the top of the screen if you want to reveal less of the photo.
NOTE: Black cuts away the mask and reveals what's underneath,while white hides and any shades of gray are varying opacities. Don’t forget to set your opacity back to 100% and flatten and save.
with mask to make a photo layer mask.
Creating attractive photo borders or creative cutouts can be an easy and fun task when using masks. In this short tutorial I will show you how to give your photos an easy and creative cutout while painting on a mask with brushes.
1. Open a photo that you intend to use. This is what I’ll use to demonstrate.

2. Make a solid fill adjustment layer by clicking Layer>New Fill Layer>Solid, or click on the half black/half white circle in the bottom of the layers palette and choose Solid fill. Choose white as the color. Follow images shown below.


3. Lower the opacity of the fill layer to reveal the photo underneath. Somewhere around 75% should do nicely.

Now you should be able to see the image underneath as shown below.

4. Choose the Brush Tool[B] and select a big brush, preferably a paint stroke brush, something with character and ragged edges. Choose black as your foreground color.


5. Select the mask on the Fill Layer, now start painting with your brush to reveal what you want visible, if you feel you messed up on a spot, just select white as your foreground and paint over it to cover it up, then switch your foreground back to black and continue till you feel satisfied with the results. When done be sure to raise your opacity back to 100% and flatten and save.

Here’s what I have using the brush selected from above step 5.

Something I like doing also, is to use some swirl or decorative brushes to add some flair.

6. Optional, you can always reduce the opacity of the brush in the options bar at the top of the screen if you want to reveal less of the photo.
NOTE: Black cuts away the mask and reveals what's underneath,while white hides and any shades of gray are varying opacities. Don’t forget to set your opacity back to 100% and flatten and save.
Here’s some links to brushes that might be of interest.
Paint Brushes
More Paint Brushes
And More Paint Brushes
Decorative Brushes
More Decoration Brushes
Floral Brushes
Paint Brushes
More Paint Brushes
And More Paint Brushes
Decorative Brushes
More Decoration Brushes
Floral Brushes
Friday, 23 July 2010
Photoshop Tip: Turn on the Alignment Options in the Move Tool
Let's face it, you create a new document,copy and paste a new image onto the canvas, and try to position it to the center, if you're a beginner, you may try to judge the center point by using your eyes. But believe me, your eyes don't always tell the truth.
That's when the alignment options come in handy. Simply click on the “Move”tool ( shown below).
Then you will see the alignment options appear on the top (menu bar) that I have hi-lighted and shown below.
And let's say you want to position an object in the center of the canvas, simply Ctrl+A to select the whole canvas,then you will see some alignment options become clickable.
And then you simply click on "Align Vertical Centers" and "Align Horizontal Centers" you will see the object is now positioned in the center of the canvas.
Like any thing else, the more often you do this, the quicker it becomes second nature.
That's when the alignment options come in handy. Simply click on the “Move”tool ( shown below).

Then you will see the alignment options appear on the top (menu bar) that I have hi-lighted and shown below.

And let's say you want to position an object in the center of the canvas, simply Ctrl+A to select the whole canvas,then you will see some alignment options become clickable.
And then you simply click on "Align Vertical Centers" and "Align Horizontal Centers" you will see the object is now positioned in the center of the canvas.
Like any thing else, the more often you do this, the quicker it becomes second nature.
Tuesday, 13 July 2010
2 Photoshop Tips
Photoshop Tip 1: How to Draw a Perfect Circle/Square
Here's a quick but basic Photoshop tip for beginners.Let's take a look at the toolbox and find the set of drawing tools as shown below. (To expand, left click on the rectangular tool and hold)
You can use these tools to draw rectangular or oval shapes, as shown below.
Now here's the trick, if you would like to draw a 'PERFECT" circle or a square, you must hold down the shift key while dragging your mouse.
That's it.
..............................................................................................
Photoshop Tip 2: Unlocking The Background Layer
Trust me, there will come a time that you will want to
unlock the background layer, for whatever purpose.
To do so, simply "double click" the background layer on
the layer palette, as shown below.
Trust me, there will come a time that you will want to
unlock the background layer, for whatever purpose.
To do so, simply "double click" the background layer on
the layer palette, as shown below.
You will then be prompted with a new window, simply click OK.
And you will now see the lock on the background layer is gone,
that means the background layer is now unlocked.
You can now drag the background layer up and down,just like all
other unlocked layers.
That's it.
other unlocked layers.
That's it.
Saturday, 10 July 2010
Blogger Tip: Mouseover
![]() Run your mouse over the image. I've had a few people ask about how to do the mouseover, so I thought I would show you how to achieve it. 1. It's not necessary to back up your template as you aren't going to touch any part of the template HTML. 2. You need to find two images you want to use and they MUST be the same size in measurements. You also want to keep the kilobytes as low as possible so it doesn't slow down when loading. 3. You need to upload them somewhere for storage, I uploaded mine to Picasa. You will need the location of the images, meaning the URL information of both images, so you need to make note of them and save. 4. Open a NEW post. You will not be publishing this one, and will eventually delete it after first saving it as a draft. It is only to help you upload your images and get the code that is returned. 5. All that remains to do is add the javascript to"envelope" the two images, or add the pictures URLs to the Javascript, depends on how you see it. Here's the script. .......................................................... <table align="center"><tr><td align="center"> <img onmouseover="Javascript: this.firstsrc= this.getAttribute('src'); this.secondsrc= 'http://bp0.blogger.com/_fV9I2C_dAUY/R2Wrh1GGLRI/ AAAAAAAAASM/pn8sq1dh8vc/s400/tulip_pink_round_blu. gif'; this.setAttribute('src',this. secondsrc);" onmouseout="Javascript: this.setAttribute ('src',this.firstsrc);" alt="" src='http://bp2.blogger .com/_fV9I2C_dAUY/R2WrhVGGLQI/AAAAAAAAASE/ gPIt_Eq88zw/s400/tulip_purple_round_blu.gif' /> </td></tr></table> ........................................................... (Post 2nd image URL first) ( Post 1st image URL second) 6. You can copy and paste the code into the post. * The SECOND (rollover, mouseover, whatever) picture link is the first one to appear in the script; the FIRST (static) picture link is included as the second link reference - (hey, it's not me being difficult - it's the way the script works!). *You must (duhhh, obviously!) change the pic URL links in the script to the ones returned by Blogger when you upload your own pics. * It is IMPORTANT that you make sure that the quotation marks that surround the URL links are single ( ' ) and not double quotes ( " ), as this has a relevance on how the script is executed. NOTE: Do not copy and paste/edit in Microsoft "WORD" for it will add extra code. I did mine in NOTEPAD. I can honestly say, putting this one together was a chore and sucked all life out of me. I will rest now! |
Thursday, 8 July 2010
Photoshop Tip: Image Pop Blur / Overlay Effect
![]() Touch image for a before and after "Mouse Over" effect. This is one of those tricks most of you already know, but for those who don't, you're gonna love it. This is a simple trick that will make those light or over saturated images pop. Let's get started. Open an image you feel needs some help. Now, duplicate your picture either by dragging it to the "Create New Layer" icon next to the trash can at the bottom of your Layers Panel or hitting "Ctrl + J" on the keyboard. Next we're gonna apply "Gaussian Blur" (Filter/Blur/Gaussian Blur) now set the "Radius" slider to 4.0. Blurry isn't it? Now go to the "Layers Palette" and change the "Blending Mode" from "Normal" to "Overlay." What a difference! I sometimes adjust the "Opacity" level, and as seen here I set it at 80%. If you look at the before and after, you can see that this method makes the light tones lighter and the dark tones darker while softening it. Sometimes applying a higher percentage of "Gaussian Blur" along with a higher "Overlay" percentage gives a dreamier effect. That's it, hope it was fun. |
Subscribe to:
Posts (Atom)